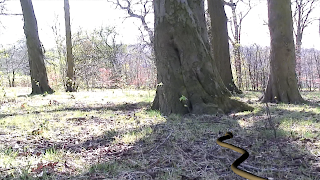
The lights and shadows used in these screenshots are not those to be used in the final sequence, but clearly illustrate the effectiveness of the Matte/Shadow material.
Welcome to the production diary of my Advanced Animation and Special Effects sequence.
Tuesday, 22 March 2011
Shadow Catching
In order to realistically catch and create shadows I created a ground plane and a proxy tree with a Shadow/Matte material applied. This will allow me to use them both as a guide for the animation and to receive shadows and create realistic ambient shadows. I initially thought I would have to mask the tree out manually in post production, however after creating the spline and setting up the animation path around the tree I found the Shadow/Matte material does this automatically. The downside of this is that the tree model I am using will have to be built to match the tree in the footage exactly if the snake is to look like it is actually wrapping around the real tree.
Monday, 21 March 2011
High Resolution Snake
I have completed the high detail snake model, which will be used to project detail onto the lower poly version in the form of texture maps. Hopefully I can transfer enough of the scales detail to the ambient occlusion map to allow me to paint a diffuse map which is consistent with the scale pattern. However from my experience some of the high level detail is likely to be lost in the decimation process which is necessary in order to get the model stable in 3ds max.
Tracking footage
After capturing my desired shot several times, I tracked them using Syntheyes in order to see which would be the most effective.
After deciding on my shot, I exported the track script to 3DS Max and merged my rigged snake model. I set the image sequence of my chosen shot as the viewport background and used the tracking markers to position and scale the snake.

After deciding on my shot, I exported the track script to 3DS Max and merged my rigged snake model. I set the image sequence of my chosen shot as the viewport background and used the tracking markers to position and scale the snake.

I will now concentrate on replicating the floor plane and the tree in 3d in order to catch shadows and add realism to the scene. Modelling the tree will also prove useful as a guide for effectively animating the snake so it appears to be around the tree.
Thursday, 17 March 2011
Snake Animation Shot Test
I created a simple animation to test both my animation method and proposed shots for the footage.
At this stage I am happy with the results, however the snake looks very small and thin in comparison to the tree. If the snake was bigger I would need to use smaller bones and increase the amount to ensure the snake followed the path effectively without any extreme bends in the mesh.
At this stage I am happy with the results, however the snake looks very small and thin in comparison to the tree. If the snake was bigger I would need to use smaller bones and increase the amount to ensure the snake followed the path effectively without any extreme bends in the mesh.
Tuesday, 15 March 2011
Spline IK Animation Test
After playing around with the Spline IK method, I also found the progress along the path could be edited and animated to determine where the snake will be at set points in the sequence, which would prove very useful. Another benefit I have found with this method is that the actual vertices of the spline can be edited and animated, and no stretching will occur in the model's mesh, the path will simply be changed.
I created a simple test animation to see how effective this method of animation will be.
This has proven this method is probably the most effective for the results I intend to achieve. The only downside to this method is I am unsure how to rig the snake so I have control of the head. This is something I will look into.
Rigging with Bones
After testing the CAT rig I decided this was not the most practical method of rigging my snake.
I researched other methods and found I could rig the snake with basic bones and use a custom spline to drive the animation, almost like a train track. This sounded very appealing so I quickly created an IK bone chain to fit the snake, quickly skinned the snake to the bones and created a spline on which the bones would travel.
I will likely use this method for my final sequence, as it seems it will allow a larger level of customisation and control than keyframing, and any changes to the path will be visible instantly
I researched other methods and found I could rig the snake with basic bones and use a custom spline to drive the animation, almost like a train track. This sounded very appealing so I quickly created an IK bone chain to fit the snake, quickly skinned the snake to the bones and created a spline on which the bones would travel.
As you can see, by default the bones only affected the part of the mesh they were placed, suggesting the envelopes were too small and the bone count was not high enough. I experimented with editing envelopes and found that making the bones cover a greater portion of the model, the bends and coils became a lot smoother.
I will likely use this method for my final sequence, as it seems it will allow a larger level of customisation and control than keyframing, and any changes to the path will be visible instantly
Sunday, 13 March 2011
Snake Rigging Test
Before moving any further with my model I have decided to conduct a series of tests to determine the best way to rig and animate the low resolution model.
My preferred method of rigging would be through the use of the CAT system within 3DS Max. I created a custom rig preset and quickly skinned the model to gain some idea of how easy and effective the process would be. I then experimented with posing the snake to test the rig and skin.
The results of this test showed the bends looked square and too sharp. I was able to reduce this effect and improve most of the deformation by editing the skinning envelopes. Overall it looks a lot better but there are still some problem areas I was unable to fix.
While this may look a lot better, this is only a static pose and I have yet to test the way the rig animates. It's likely more bones will be needed to effectively recreate the fluid movement of a real snake. I also need to change the placement of the rig's 'neck' as it currently controls the front third of the snake and doesn't allow realistic movement or deformation of the head and affected body area.
High Resolution Snake Work In Progress
Just an update to show high detail snake in its current state. Following feedback from my idea pitch I have decided to scrap the horror theme and instead I will focus on trying to create a nice, realistic animation of a new snake species. I intend to give the snake a camouflage ability so a lot of tests will be carried out to determine how possible this would be and how effectively it can be done.
I have refined the shape of the head to be more defined and look more like that of a horned viper. As the horror elements have been removed from my idea, the mouth will no longer need to be wide open and visible to the camera. I have made adjustments to the model so the mouth is closed, which has helped as before I had no way of seeing how well the bottom of the mouth lined up with the top.
There is still a little high frequency detail to be added and refined onto the head, and I intend to place a repeating scale pattern along the entire length of the body.
Subscribe to:
Comments (Atom)


